Pages

Friday, December 28, 2012

hostess cupcakes.

These cupcakes are my absolute favorite and  I am sharing the recipe!  Chocolate cake, cream filled center and chocolate ganache. What's not to love?

Ingredients:
*1&1/2 cups of flour
*3/4 cup unsweetened cocoa powder
*1&1/2 cups of sugar
*1&1/2 tsp baking soda
*1&1/2tsp baking powder
*3/4 tsp of salt
*3 eggs
*3 tbsp of vegetable oil
*1 tsp vanilla extract
*1/2 cup unsalted butter
* 3 tbsp sour cream
*3/4 cup warm water

Combine all dry ingredients together in mixer on low speed.  Add eggs, butter, oil, vanilla, sour cream, and water. Beat until smooth. Bake @350 for about 20 minutes, or until toothpick comes out clean.  Let cool completely and make frosting!

An extra creamy vanilla butter cream:
*Mix 1/2 cup of unsalted butter, 2 tsp of vanilla, and a pinch of salt together with an electric mixer.  Slowly add in approximately 4 cups of powdered sugar 1 cup at a time, add 2 tbsp of flour,  around 3 tbsp of cold milk. You might need to add in more milk or powdered sugar to have your desired consistency.  The icing should still make peaks, but needs to be loose enough to easily flow through a piping bag.

Fill piping bag with frosting and for best results use a wilton #12 tip for filling the cakes.  Gently insert the tip into each cake, squeezing firmly to release frosting, and slowly release as you remove the tip.  Be careful not to insert too much frosting, or the cupcake will burst.  You can also try this method to fill the cakes!

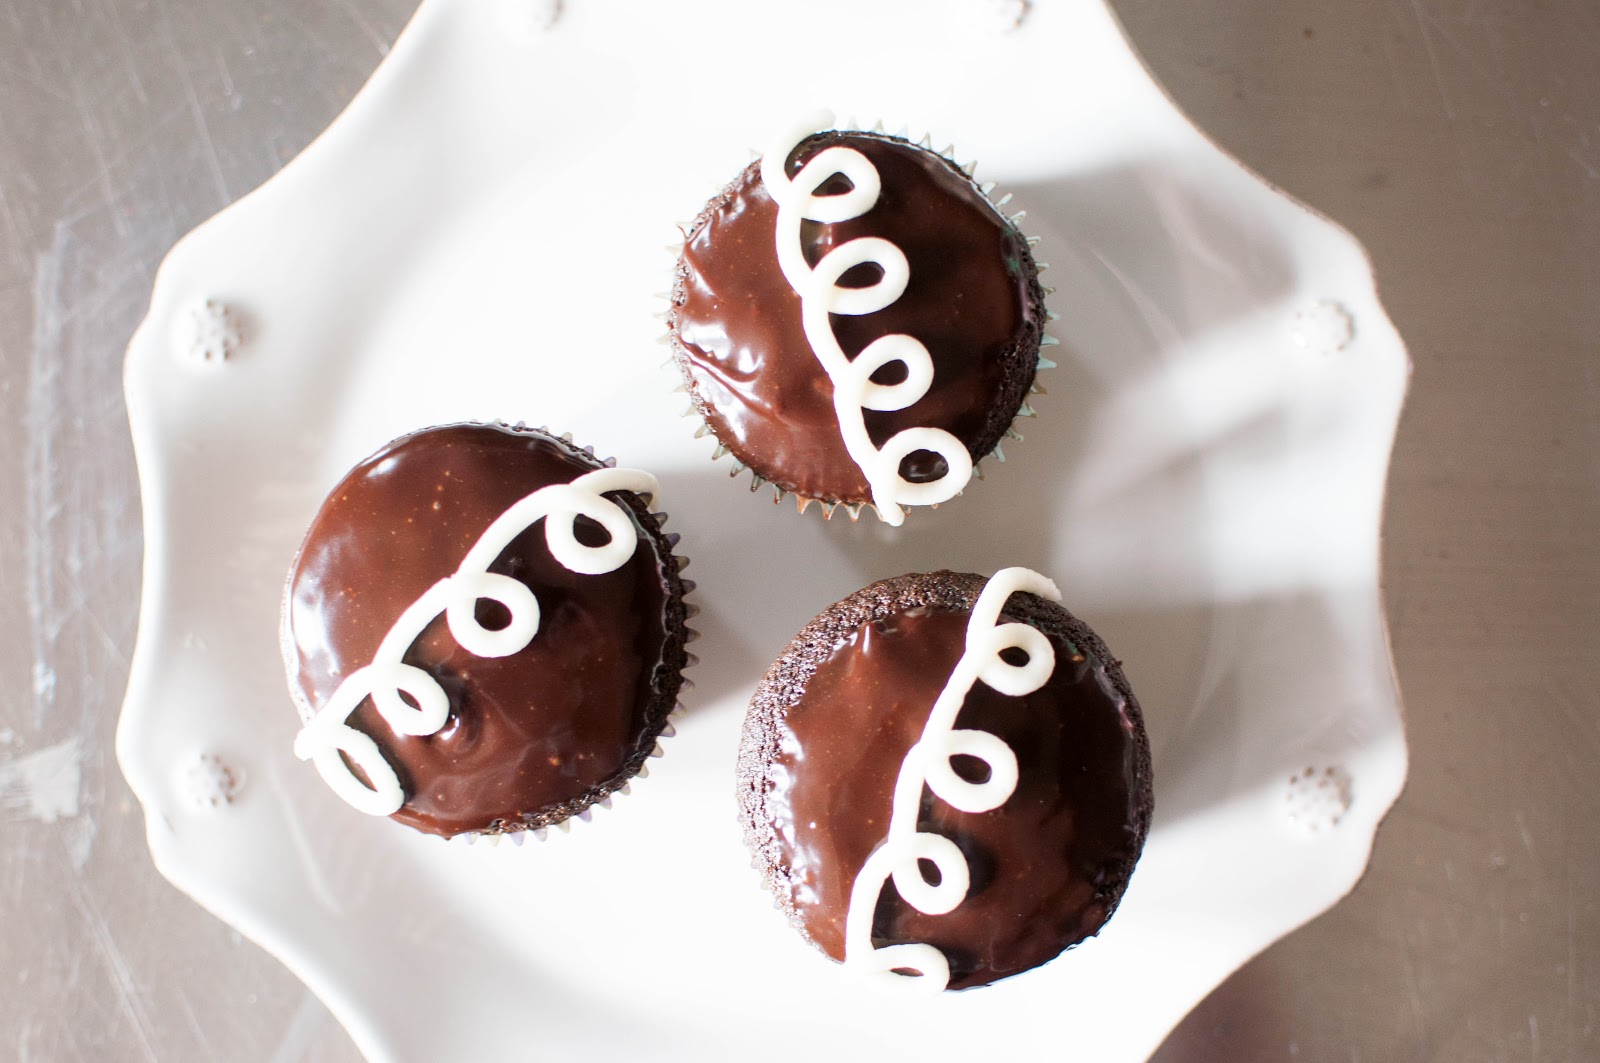
For the chocolate ganache:

Heat 1 cup of heavy whipping cream to a slight boil, pour immediately over 9 oz of semisweet chocolate chips and stir, ganache will need to thicken slighty and cool before dipping the tops of the cupcakes!
After filling all of the cupakes, switch to a wilton #5 tip for piping the classic hostess look.


Wednesday, December 26, 2012

Merry Christmas!


Hope you guys had a wonderful Christmas! Ours was lovely- we spent lots of quality time with family, playing games and enjoying good food!

Saturday, December 22, 2012

diy abstract gift tags.


For this project you will need:
*1 piece 8x10 of watercolor paper or cardstock, any thick papers will do.
*Acrylic paints or Watercolors, ink pen
*hole punch
*twine
   Step 1: Paint entire sheet of paper with your own abstract design, think about lines, shapes, colors. After the paint is dry, you can add in more details with an ink pen!

     Step 2: Cut dry painted paper into various shapes! ( I chose a lot of different shapes in order to use the entire paper)
     Step 3: Punch holes and tie with twine, you can write on top of the design or use the blank side.


Wednesday, December 19, 2012

diy seashell ornaments.

Each year I try to make a few new handmade ornaments for our Christmas tree! For these, I just painted these sand dollars and attached some twine for hanging.


For more painted shells you can check out this post and for other ornament ideas look here!

Tuesday, December 18, 2012

diy mason jar snow globe.

Here's a DIY project perfect as a gift or just a charming decoration for your home.  I was originally inspired by these mason jar snow globes at anthropologie for around $28, and I made this one for $5!

  This project only takes 5 minutes and you can customize it however you would like!
You will need:
* A found or bought clear jar, large enough for your trees to fit inside
* Miniature trees & any other unique trinkets you would like to be in it
*artificial snow flakes, or glitter
*hot glue
( you will probably have enough materials to make several jars, my sister and I made three!)
STEP 1: Remove lid and on the base of the lid that goes inside of the jar, hot glue your trees and trinkets.
STEP 2: Fill jar with artificial snow, around 3 tbsp.. too much and you will not see the trees!
STEP 3: Twist the lid carefully back onto the jar and gently shake to move the snow.


Sunday, December 9, 2012

pie crust with a twist.

An easy pie crust perfect for your favorite pie recipe!
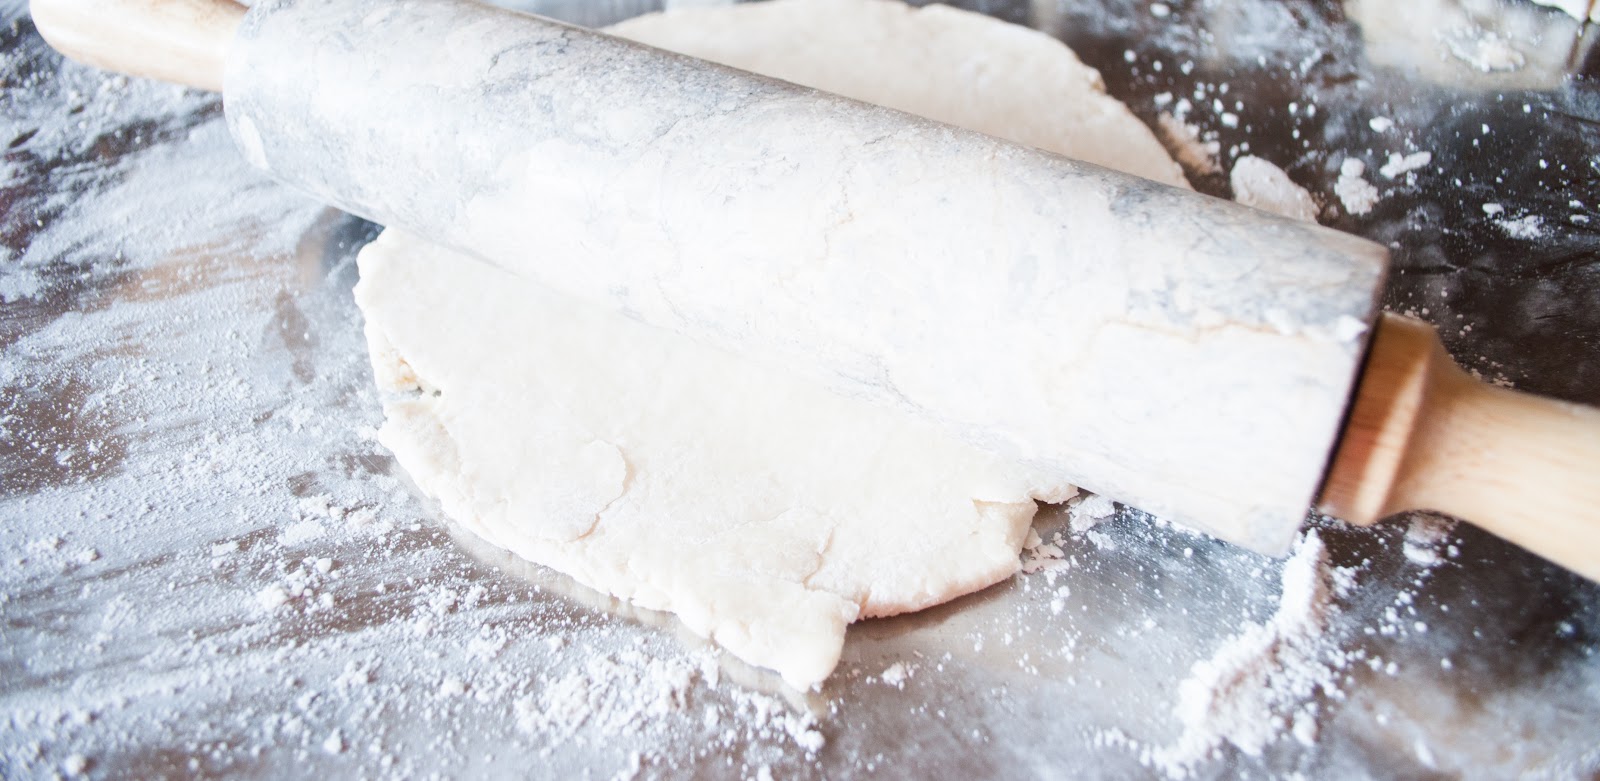
 Recipe for 2 pie crusts:
*2 1/2  cups of sifted flour
*3/4 cup of cold cubed salted butter (if you don't have salted butter on hand, just add a pinch of salt)
*ice water
*pie tins, and knife for cutting excess dough
Churn butter and flour together in a mixer, add ice water 1 tsp at a time, until it becomes a dough consistency. Flour surface, and roll out dough. I half the dough and roll each pie crust out separately. 

 Once dough is rolled to desired thickness, pick up and drape across pie mold.
 Trim off the excess dough for a clean edge.
 Roll out the excess dough, and cut into 1/2 " strips. Pinch 2 strips together and braid them by overlapping. You can also use 3 strips.
 Score pie crust edge with a knife and press braided section onto pie crust.  Repeat until complete.  You will use approximately 3 braids.


Monday, December 3, 2012

k+w now on my photo blog!

Check out the photos of my sister-in-law Kelly and her boyfriend Winston over here


Wednesday, November 21, 2012

engineer prints.

I wanted a unique and inexpensive way to display some more of my photos in our home.  There are always great deals on photo enlargements, but its hard to find huge photos without paying a lot for it.  I saw on pinterest, how several people were going to Staples and having photos printed as engineer prints.  I could purchase a 3 foot by 4 foot print for 6 dollars! I quickly converted some of our  favorite photos to black and white and rushed to have them printed!

How to prep that giant photo for wall hanging:

For a surface to mount your photo on, I would suggest using either luan plywood (its lightweight and smooth, and you could easily build a frame around it), or foam insulation board (its super light, you can paint it, and you only need an x-acto knife to cut it!

For this project, I went with the foam option! One sheet of foam insulation board cost about $8.00 and I had enough to mount 3 photos.  

I measured out the exact size of my photo with a ruler, and used a metal t-square to assist me in my cutting process. Try lining up the ruler with your cut, and cut towards the t-square while firmly holding it in place.  You will get a cleaner cut this way.

I then painted the edges of the foam board with black acrylic paint and let dry.

To glue onto the board, I used rubber cement.  I worked from one side of the photo to the other- applying rubber cement to the foam and smoothing it out with my hand. 


Wednesday, November 7, 2012

diy photobooth.

 It seems that the latest craze is having a photo booth at your wedding or event.  I love this idea and think its a fun and relaxing activity that everyone has fun with! I created my own using items you probably already own!
Things you will need:
*Digital Camera with self-timer or remote
*tripod
*backdrop (any fabric or tablecloth will do)
*props
 To give my photos that photo booth look I put them into a photo editor, you could use a free one like Picasa by google and add borders or create a photo collage or strip!
 For easy props, I grabbed a few items that I had around the house... an old frame, scuba mask. And then found these packs of mustaches and glasses for $1 at Target. I then attached them to wooden skewers for easy handling!

 To hang the backdrop we tied each end with twine and attached to two nails that were already supporting our lights!  The tripod and camera was set up right in front of this and all our guests had to do was press the remote to take the picture!


fall party.

 Before the cold weather truly arrived, we had some friends over for a fall frolic! We carved pumpkins, roasted s'mores, and even had fun with a diy photo booth!