Monday, December 26, 2011
merry christmas!
Posted by
Morgan Corbett
Labels: barn, wedding, teach, cupcakes and cakes
holiday
at
6:12 PM
0
comments

Tuesday, December 20, 2011
ornamental.
Still putting up that tree, or needing a few extra ornaments? Here's some ideas that are easy, unique to your tree and made by you!
Idea #1 Purchase plain glass ornaments and pour your favorite colors of acrylic into the center and twirl it around!
Idea #2 Collage papers onto old ornaments that have lost their flair or plain ornaments purchased inexpensively. I did this project with some of my elementary art club students. They loved it and it was so easy!
To create:
*gather magazine papers in similar colors, decorative papers, or newspaper
and tear into small to medium size scraps.
*remove metal cap at top of ornament for hanging
* mod-podge the papers onto the ornament using a sponge brush, let dry.
Posted by
Morgan Corbett
Labels: barn, wedding, teach, cupcakes and cakes
holiday
at
5:19 PM
0
comments

Sunday, December 11, 2011
going green.
One of my recent thrift finds was this little chest at a garage sale for just 5 dollars. I couldn't believe the unique charm that this chest had, and I knew that it was a perfect candidate for a cool paint job! So here's the transformation...
 |
| BEFORE |
 |
| AFTER |
Posted by
Morgan Corbett
Labels: barn, wedding, teach, cupcakes and cakes
painted furniture
at
12:37 PM
1 comments

Monday, November 28, 2011
cloudy with a chance of CAKEballs...
This has been on my list of things to experiment with for a while- To be honest.. I really don't know how all the cake pop bakers out there do it. They are easy to make until you get to the part where you cover them in chocolate. It just doesn't go on very pretty. SO... I decided to give mine a different look. Instead of trying to cover the entire thing, I just drizzled the melted chocolate on the tops and then sprinkled on my toppings! It might not look quite as put together as others out there, but they tasted good!
TO CREATE:
TO CREATE:
* I used my grandmother's scratch red velvet cake recipe ( most just use a box) and baked it in a 9x13 pan.
* let it cool then using a fork, smash cake into crumbs!( how often can you do that?)
* mix crumbed cake with cream cheese frosting
1pkg cream cheese
1/2 stick of butter
1tsp vanilla
pinch of salt
2 tsp of flour and approx. 4 cups powdered sugar- or until peaks form.
* form into 1 inch round balls and place on a cookie sheet, refrigerate at least 2 hours
*remove from fridge, melt baker's chocolate and dunk or drizzle (you pick)
*coat with your favorite toppings and let chocolate harden.
* I served them in mini cupcake liners!
Posted by
Morgan Corbett
Labels: barn, wedding, teach, cupcakes and cakes
eat cake
at
3:49 PM
0
comments

Sunday, November 27, 2011
adventures in fondant.
I sort of a had a cake decorating party the day before Thanksgiving. I had been wanting to experiment with fondant for a long time- and once I started everyone wanted to join! You can make almost ANYTHING with fondant and so we decided to take that to extreme- constructing a cake complete with a replica of our home, a turkey, ice cream, a hot dog and several trees. Shane, my sister, brother and I spent more time than we would like to admit crafting turkeys' out of fondant. It made for a super fun time- so I definitely recommend it for a date night, or just a fun time with the family!
Posted by
Morgan Corbett
Labels: barn, wedding, teach, cupcakes and cakes
eat cake
at
8:36 AM
0
comments

Sunday, November 20, 2011
why my job is pretty awesome
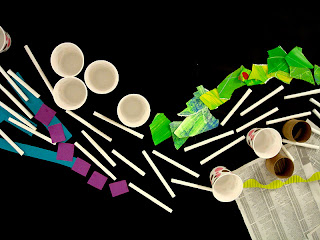
This is what I made at work the other day...I had about 40 minutes without students and decided I should make the most of it. Most grade levels are currently learning about abstract art- So i decided to install a little abstract work of my own outside of my classroom! I ran into the supply closet and started grabbing random things, made a small sketch of my plan and began! WHAT I LOVE MOST ABOUT THIS IS that in class I haven't really been announcing the project outside the room, but as we start talking about it- or as the students leave- they are like," Hey! That's abstract art too!" For now- its just what I did, but I'm thinking about letting my art club students put some extra touches on it next week!
total items used so far: paper and painted papers from the scrap/recycle bin, cups, paper towel rolls, phone book pages, straws, border paper, and bottlecaps!
total items used so far: paper and painted papers from the scrap/recycle bin, cups, paper towel rolls, phone book pages, straws, border paper, and bottlecaps!
Posted by
Morgan Corbett
Labels: barn, wedding, teach, cupcakes and cakes
teach
at
10:18 AM
0
comments

Saturday, November 19, 2011
wall remodel
I realized I never shared our recent remodel. For the past year we have loved the open, loft-like feel of our home- but it became a slight problem with Shane and I on such different schedules each week! So our solution...add a wall! During the process we were slightly worried about the end result and if things would feel too closed in- but it's actually perfect! After the wall completion I decided we needed something- I have forever been wanting to create a photo collage straight on the wall, no frames. So I did it. Hot glue and some of my favorite photos. I realized I probably won't always have completely wooden walls that I can do almost anything to, so I went for it. It's still in progress but here it is so far..
 |
| wall in progress.... |
 |
| after (living room side) |
 |
| progress |
 |
| photo wall progress... |
Posted by
Morgan Corbett
Labels: barn, wedding, teach, cupcakes and cakes
home
at
10:53 AM
0
comments

Wednesday, November 16, 2011
tiny paintings
I made these for our friends, Robyn and John. They are having their first baby and we are pretty excited!
Posted by
Morgan Corbett
Labels: barn, wedding, teach, cupcakes and cakes
art along the way
at
4:15 PM
0
comments

Wednesday, November 9, 2011
diy longboard.
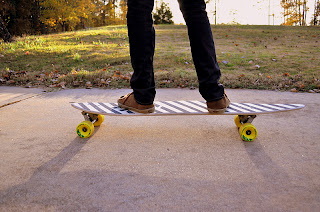
So occasionally I post about my family, they are crazy creators themselves and are always up to something. My brother especially. He has recently made 2 longboards by himself- with a little help from my dad, and ME for the artistic design. I think it looks pretty awesome if I do say so myself. This board was made out of birch wood, and we drew and cut out his designs for the board on grip tape!
Posted by
Morgan Corbett
Labels: barn, wedding, teach, cupcakes and cakes
art along the way
at
5:37 PM
0
comments

Tuesday, November 8, 2011
what my students have been up to...
I just had to share some images of what's been happening in the art room the past month or so. I am so impressed with the art these kids can make :) And the best part... they are SO proud of their work!


 |
| 2nd grade Wayne Thiebaud oil pastel drawings |
 |
| Art Club crayon art |


 |
| 5th grade 1-point perspective cityscapes |
 |
| Kindergarten Kandinsky Collage |
 |
| 2nd grade drawing from observation |
Kindergarten Texture Burgers
 |
| 3rd grade value drawings in oil pastel |
 |
| 4th grade value drawings from observation |
 |
| 5th grade value drawings from observation |
Posted by
Morgan Corbett
Labels: barn, wedding, teach, cupcakes and cakes
teach
at
4:31 PM
0
comments

Subscribe to:
Posts (Atom)


