Pages

Monday, March 26, 2012

diy for the home: geometric re-painting

 
I had an old painting that I was not a fan of and my original plan was to paint over it completely.  Upon further consideration I decided to try a few other things first- sort of giving this thing its last chance...
1. The painting I started with
2. I taped off some geometric shapes with painters tape.
3. I covered it completely in dark blue paint and removed the tape!   
Don't have an old painting you are ready to part with? Create your own painting underneath with the intention of painting over it.  I'm liking the result for now, so it might stick around a little longer...

Tuesday, March 20, 2012

home inspiration: decor or store?

A common mistake I make when it comes to decorating is sometimes trying to hide things that show my life. I always feel like I need all enclosed storage. Our current house makes that rather hard sometimes and so I have been forced to come up with some solutions that store, but also are an enjoyable part of my home!

Don't be afraid to display and turn storage into art or a piece of home decor!Here's some things that I chose to use as art rather than hide in a closet.


Wednesday, March 14, 2012

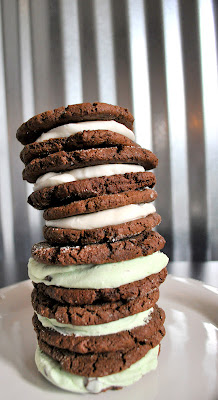
3 ways to make a cookie sandwich.


Here's 2 easy cookie recipes and 3 simple frostings that   I made this weekend- perfect for any cookie combination!
 carrot cake cookies & cream cheese frosting
chocolate cookies & chocolate chip mint frosting/ vanilla buttercream
CARROT CAKE COOKIES:

1 1/2 cup flour
1 1/2 cup sugar
1 tsp baking soda
1/4 tsp baking powder
1 1/4 stick unsalted butter
1 tbsp sour cream
3 tsp cinnamon
1/2 tsp salt
1 egg
1/2 cup shredded carrots
1 jar of baby food carrots
1/2 cup of rasins

1. preheat oven to 375*
2. sift together flour, baking soda, baking powder, salt, cinnamon
3. with electric mixer cream sugar and butter until light and fluffy
4. add egg, beat to combine.add baby food carrots, sour cream, shredded carrots, and raisins.gradually add flour mixture until dough is combined.
5. scoop cookies into 1" rounds on parchment paper, dip the bottom of a glass in sugar and press each cookie.
6. bake about 10-12 min
 CHOCOLATE COOKIES:

1 1/2 cup flour
3/4 cup cocoa powder
1tsp baking soda
1/4 tsp baking powder
1 1/2 cup sugar
1 1/4 stick butter
1 large egg

1. preheat oven to 375*
2. sift together flour, cocoa powder, baking soda, powder, and salt
3. with electric mixer cream sugar and butter until light and fluffy
4. add egg, beat to combine, add sour cream and gradually add in flour mixture, continue beating until dough is combined.
5. scoop cookies into 1" rounds onto parchment paper, dip bottom of a glass in sugar and press cookies.
7. bake 10-12 min

CREAM CHEESE FROSTING:
1 stick butter softened
1 pkg cream cheese softened
3 cups of powdered sugar
1 tsp of salt
2 tsp of vanilla
1. beat together cream cheese and butter, add vanilla, gradually  add sugar, and then add salt.

CHOCOLATE CHIP MINT FROSTING:
1 stick of butter softened
3 cups of powdered sugar
1tsp of salt
1/4 tsp of vanilla
2 tsp of peppermint extract
1/4 cup of chocolate chips
1.beat together butter, vanilla, peppermint extract. gradually add powdered sugar, then add salt and choc chips. add more mint extract to taste.

VANILLA BUTTERCREAM:
1 stick of butter softened
3 cups of powdered sugar
1tsp of salt
2 tsp of vanilla
1. beat together butter, vanilla, gradually add powdered sugar, then add salt.

Sunday, March 11, 2012

bottle cap mural.


Bottle Cap Murals have become a unique way to create art for your school, and teach kids about helping the environment! An oak tree is our school symbol so we decided to use that as the inspiration for our mural.  My 60 Art Club students completed this in 5  2 hour club meetings.

 This project was originally inspired by this artist and my friend that did a bottle cap mural with her students!

STEP ONE: collecting the caps...
The students brought in somewhere over 24,000 bottlecaps ranging in size, shape and color. We had a competition between classes to see who could bring in the most! Then we washed and sorted them all by color in boxes.
STEP TWO:
 We used 2 pieces of plywood to create 1 8'x8' panel.  The tree was the only part where we chose to have paint under the caps, everything else  we let the natural wood show through. I assembled the 2 wood panels together with screws before we started adding caps, and we made sure not to cover the screws yet so I could undo it to transport it upstairs for its final installation.
STEP THREE: ADD CAPS! We filled in the tree first with just black tops and then drew lines in crayon so we would know where to put each color.
Here's how things progressed...


AND THE FINAL PRODUCT.....


Monday, March 5, 2012

DIY for you: fabric flower headband

what you will need:
*headband
*fabric of your favorite color
* hot glue/gun
*scissors
how to:
1. glue a 1" wide piece of fabric around the headband where you want the flowers to go.
2. cut 3 circles of fabric. smallest to largest.
3. starting with the small circle put a medium size dot of hot glue in the top middle. pinch up sides. repeat process, adding the last 2 circles under the small one.
4. I chose to make 2 flowers.. so if you want 2 make another!
5.  Glue flowers to headband.


Sunday, March 4, 2012

its truly unCANny..

Here's a quick DIY you can whip up for instant storage. These were a perfect solution for storage in our home office/studio. If you are lacking drawers..just put those items in cans!
YOU WILL NEED:
*an assortment of cans
*acrylic paint, brushes
*mod podge
*and I used a hair dryer to speed up the drying process.

1. Prime cans with white primer, or just white acrylic paint.
2. Paint away- just be sure to let dry thoroughly in between layers!
3. Coat with Mod Podge